Showing posts with label crafts. Show all posts

a bullet journal giveaway - leuchtturm 1917


I've been bullet journalling close to a year now and after looking through my collection of notebooks and journals I thought I could do a little giveaway for one of my absolute favourite types of notebook. I've been flitting to and from all sorts of journals etc and always find myself going back to Leuchtturm 1917 with dotted pages. It just fits everything you need from a bullet journal. So that's what this giveaway will be for, a Leuchtturm 1917 in your chosen colour and style. You can see the colours and styles here. I'll also be adding a few little smaller stationery bits and pieces that I think are super cute, but they're being kept a secret for now!

I've included a few photos below, or you can always search for bullet journalling on youtube and see the vast majority of videos feature the Leuchtturm 1917. All you have to do to enter is follow my blog on Bloglovin and leave a comment in this blog post stating why you'd like to begin bullet journalling or, if you already do, why you started. You can also follow me on Instagram and Twitter for two extra entries. If you also follow on my Twitter or Instagram, let me know in the comments as well!

You can use the rafflecopter below to enter! Giveaway will run from the 20th March until the 9th of April and is only open to UK readers. Apologies to any international readers, I was recently stung with sending something overseas and had to pay a hefty fee in doing so. I promise I'll do something else in the near future!


a Rafflecopter giveaway

Thanks for sticking around as well! I realise that I've kind of let it slip around here slightly, so this is also as a sort of thank you for still being here! ♥

thank you for reading!  ♥
keep up to date with all posts on bloglovin!
0

a guide to bullet journalling


Recently I've been mentioning a bit more that I'm enjoying bullet journalling and a few people have asked some questions. First of all, what exactly is bullet journalling? What does it do? Does it have to be all pretty? I thought rather than write out answers to these questions separately, I'd do a blog post on it, explaining the benefits of it and how it's the perfect combination of organisation and creativity. This is going to be a very detailed and photo heavy post, but hopefully it all helps and makes sense!

What is a Bullet Journal?  ▼

"The Bullet Journal is a customizable and forgiving organization system. It can be your to-do list, sketchbook, notebook, and diary, but most likely, it will be all of the above. It will teach you to do more with less." - bulletjournal.com

That was lifted directly from the Bullet Journal website, which was the first place I visited when I was interested in starting one. It goes over the basics of what to include in a Bullet Journal, how to use one and how to keep it going. From my experience, I started with the basics described on the Bullet Journal website and then developed it into my own system. For starters though, I'd probably recommend starting with the basics.

What is included in a Bullet Journal?  ▼

There are many things included in a Bullet Journal and it all comes down to how you want to use it. Everyone has different things in their journal and that's one of the main benefits, because it's not written and sectioned for you, you have the freedom to make it specific to your needs. For example, I use mine to track money, fitness, meals, blog stuff, sleep, things I'm grateful for etc. It's totally personal.

There are some things that everyone generally includes in their journal which help it have just a little bit of structure.

1. Index - A reference for all pages in your journal. As the journal is not laid out in any manner, you're literally making it up as you go along it means that finding things in it can sometimes be difficult. The index allows you to write down each section and the corresponding page number, like a table of contents. It really helps, especially if you start a new collection halfway through your journal. Every time you put something new into your journal, write the page number and a description of what it is in your index so you can find it again at a later date.

2. Key - This is usually just one page indicating the different types of bullets in your journal. Generally, this is a dot for a task (which is then crossed out when completed), a circle for an event and a small line for a note. There is also a forward facing arrow indicating the task has been migrated forward to a future date or a backwards facing arrow indicating the task has been migrated back to the Future Log.

3. Future Log - The Future Log is sort of an overview of the month or year. Here is where you would put general tasks you would like to get done but don't have any specific time or date you'd like to get the task completed. This means when you do finally decide to complete the task you can put the date and page number next to the entry in your Future Log for reference. It also means if you don't complete a task in your daily pages you can simply migrate it backwards to the Future Log for another time.

4. Monthly Pages - This is as simple as it sounds, a monthly spread that shows you the days of the month. Most people like to put the numbers of the month down the left side of the page and then next to it the letter of the day that falls on. This means they can quickly see the dates in the month and the days too. I've also seen others that actually draw out the calendar as it would normally look with all the boxes and stuff. This is where you would generally things that already have specific dates, birthdays, appointments etc. I also like to include my bills in this spread as it makes it easier to know when money is coming out of my bank.

5. Lists/Collections - These pages are where you can go nuts with creativity. You can literally make up your own things to track from here. The most common things to have in Lists or Collections is a habit tracker, money tracker, fitness pages, meal tracker, goals, gratitude journal, etc. The possibility is endless. I've even seen some people have Doodle a Day pages, which is so fun and interesting to see. All you have to do is write out a list or make a page of whatever you want and make sure to reference it back to your index, that way you can find it quickly if you need to.

6. Daily Pages - This is where you actually schedule out your days and to do's. The beauty of the Bullet Journal is you don't have a set amount of space per day, as you're writing it as you go. Some people like to map out their week and draw out weekly layouts but generally you can do whatever works best for you. You write out the day and date, then underneath start writing out your daily tasks using the bullets (dot for task, circle for appointment etc) and then as the day goes on you can either cross them off if you've completed them, migrate them to a new day if you won't complete it or migrate it back to the future log if you want to give yourself a bit more time to finish it. It's that simple. When the day is over, simply start your new day underneath by writing the new date or by drawing a line to separate the days for a bit more definition.

Once you have these sections you can feel free to add your own lists, drawings, pages, whatever you want. My advice is remember the index as it will help you find things you've put in your journal and remember that mistakes are there to be made!

Does the journal have to look pretty/decorated? ▼

Once you've gotten the basics set up it's literally just a case of using it and learning as you go. When I first started I was more concerned about making it look pretty with washi tape and doodles and less about how it would help me stay organised. I drew out everything in pencil and then went over with pen, which was taking double the time to write anything out. I quickly realised that another benefit of the Bullet journal is about learning from your mistakes. The first time I drew out a monthly spread or meal tracker it looked awful. It wasn't positioned right, some days were bigger than others and I put washi tape all over it meaning I had very little room to actually write anything.

The following month I simply drew a grid and filled it in as I went. No decoration and no washi tape and I honestly preferred it. It meant it worked for me and I realised that whilst it's fine to decorate it also needs to still perform a purpose. If your purpose is to have a journal that's more like a sketchbook/journal then go right ahead, but if like me you need it for organisation, I'd start with how it works for you and less of what it looks like. You can also go back and decorate a later date, which is what I've been doing. Filling in any gaps with drawings or stickers, but only when I realise I won't need that space for anything else. Function first, then decoration.

Where do you get a Bullet Journal? ▼

One of the many benefits of the Bullet Journal is you don't have to use anything specific for it, you can simply grab a notebook you have lying around and turn it into a Bullet Journal. You can however buy the official Bullet Journal which gives you the key and an index that's already laid out for you. I've found that most people tend to either use the official Bullet Journal, a Moleskine (which is what I use) or a Leuchtturm1917 as they have either squared or dotted pages and the paper quality is really good. They are quite expensive, but in comparison to a lot of other planners they fall in around the cheaper end of the spectrum. Alternatively, you can also use a normal notebook/jotter that you already have and start from there if you don't want to spend a bit more on one of the more common notebooks used.

A look into my Bullet Journal ▼

I thought I'd show you an overview of my Bullet Journal. Now keep in mind that I'm still learning and quite often make mistakes when drawing things out. I've taken quite a few photos of the general set up and some of the pages that I plan to use for November. The only pages I haven't taken photos of are the daily pages, simply because these have some personal information in them! I haven't filled out anything in November yet as it's still coming towards the end of October, but I'm looking forward to filling them in as I go!


The outside of my Bullet Journal. I taped down this cute little cat image, which I loved as it's like Joy Division's album Unknown Pleasures. So Cute!


This is my Index, literally the simplest way to write out a table of contents. Pages numbers on the left, descriptions on the right. I've also highlighted the months, so I can find them easier.


This is a very simple Key, just to give you an idea of what it generally looks like.


This is my Future Log. I have the pages split into two months per page. I don't have much in them yet, I'm still figuring out what I want to include in these pages.


This is start of my November pages. I just wrote out the big November and drew a floral circle around it and stuck some washi tape to the top and bottom of the pages. Quick and simple, only took me around twenty minutes or so.


This is my monthly overview. As you can see there is quite a lot in here. I have the days of the week down the left hand side along with the corresponding day of the week. I also have a section further across that page for my monthly bills, which means I can track when money is also coming out of my bank on the same spread, saving space. On the next page is a daily money tracker. Each day I can write out what I spent that day and on what, write the total in the next column and then keep a running total on the right. Underneath is a wish list, so I can write down things I want vs things I actually need. This helps because it lets me prioritise things I need over things I think I actually want.


Next is my goals page and gratitude tracker, which I've labelled as 'happy things'. I always have a goals section as I like to write things down that I want to accomplish. I find it keeps me motivated when I know I can look back at the previous month and see how much I actually accomplished for my goals. It's not even huge things, sometimes it's little things like go a full week without any fizzy juice. Even little goals feel good to cross off once I've reached them.

I also always have a gratitude section. I love looking back at the end of the month and re-reading all the things that have made me happy that month. I try to write out at least one thing per day. Even if I've had a pretty bad day I'll always try and write out at least one thing that made me smile. Usually this revolves around something Craig said or did, cute animal things I've seen or read or just the fact that someone texted me first. You know, little things!


This is my blogging section. It's pretty straightforward and simple. On the left I have the days of the month so I can write out when my blog posts are going live and see them in advance. I've been trying to schedule more posts now so I can keep on top of my content. Next to that is my Bloglovin tracker. My following has been going up and down recently in spikes and I can't figure out why, so I'm using this to track it daily to see if I can notice any pattern.

At the top of the next page is a social media tracker, so I can write my stats in weekly and see if they're increasing or decreasing. Under that is a section for any blog to do's I might have and if I get any ideas for posts or social media content.


I've also started tracking my meals properly so this is a very simple meal tracker. I'm just going to write what I had to eat that day and monitor it throughout the month. I've also given myself little rules for the month, such as cut down on fizzy juice, no snacking on crisps/chocolate etc. (We'll see how long that one lasts, I love crisps!)

On the next page is a monthly cleaning schedule, which shows me things I should be doing on a daily basis, a weekly basis and a monthly basis. I sometimes find that I go through crazy cleaning periods where I literally gut the flat over a day and then I go a few days where I don't do anything. I want to use this to keep myself in check and to keep the flat tidy all the time.


The sleep tracker is a new thing. I've sort of fallen out of a sleeping pattern which is so annoying as some nights I can go to bed at 10pm and others I don't feel tired until 3am, which is really messing with me and giving me some pretty serious headaches. I've got a few columns, one for what time I went to bed, if I was on my phone in bed and for how long, how many hours I slept and what I dreamt that night. Sometimes I find that if I have pretty horrible dreams I wake up with such a horrible pain behind my eyes, so I'm monitoring my dreams too.

Next is a thirty day fitness challenge. Pretty self explanatory, each day has different exercises that increase in increments as the month goes on. I've never really stuck to a fitness tracker before but I'm hoping that now it's in my journal that I'll actually do it.


Then I have a to watch/read/listen section. This is where I write down everything I want to watch, to read or to listen to through November. Sometimes I'll think of a film or tv show and want to watch it again but then never remember to and then it'll bug me for ages because I'll have forgotten what it was I wanted to watch. It's the same with books or albums/podcasts. This way when I think of something I just write it down and come back to it later.

Lastly is my habit tracker. This is probably the most common thing found in a bullet journal. I use this to track good and bad habits as well as online habits I'm trying to embed in myself. It's just a little table with the habits down the left hand side, the dates along the top and then if I do a certain habit on that day I'll colour the box it. It's a great visual of things you want to track and highlights where and when you might be falling down on doing certain things.

What pens/stuff do you use in your Bullet Journal?  ▼

I use a few different types of pens in my journal. The pen I use to draw out my grids and actual layouts etc is a black Staedtler Triplus Fineliner in 0.3 which I got in a set of thirty with loads of other colours that I use to decorate. These pens are fantastic as they dry really quickly, I find they don't smudge and they don't bleed through the back of my pages. The pen I use to actually write with is a Pilot G-Tec-C4 0.4 in black. Again, this pen is really good because I find it doesn't smudge and it writes really well and doesn't bleed through the back of the pages.

I also use a few different types of highlighters. The main ones I use are the Pilot Frixion Highlighters and the Zebra Mildliners, both which I use to highlight certain things or important tasks I need to get done. I don't really have a colour code system, I sort of just highlight as I go. 

I also use washi tape as well as stickers and generally anything else I want to add to it to make it look little bit more personal.


So there you have it. A pretty extensive overview of Bullet Journalling and a look into what I include in mine. I hope this blog post helps and if you have any questions or anything related, please don't hesitate to ask. I'd also love to know if anyone uses a Bullet Journal and how they use it. Let me know if you do, I love having a nosey at other people's Bullet Journals!

thank you for reading!  ♥
keep up to date with all posts on bloglovin!

0

Paperchase mini haul


Is it just me or is anyone else struggling to get decent light for photos now? Just me, okay.

The last few days have been spent going in and out of Glasgow for various reasons and each time I wander through the giant Paperchase staring at everything. I actually had a few things to take back there that I decided I wasn't going to use so instead of getting of getting my money back (the sensible thing) I decided to exchange them for store credit. It wasn't much, only £20 or so, but it helped fund my new obsession. - Bullet Journalling. I've recently fallen in love with keeping a bullet journal and decided that if I was going to do it properly then I need a decent notebook and materials. Simply an excuse to buy more stationery really!

I had read online about Moleskine and, even though I've had their regular ruled notebooks, I decided to get their squared notebook instead, since this makes bullet journalling a little easier. The paper quality is lovely and the spine lies flat when you open it up, something that I was definitely looking for.

I also found these beautiful little rose gold accessories, paperclips and page markers. They're both so lovely, especially the page markers, they're solid metal too so they won't bend if you carry your journal around with you. I imagine they're rose gold plated though, so we'll see how the coating holds up over time.

I can't wait to sit down and start a new journal. My old one is almost full, so once that's finished I'll be moving onto my new one! Is it weird to be genuinely excited over a new notebook and rose gold stationery? I hope not. I wouldn't care if it was anyway, pretty stationery makes me so happy!

thank you for reading! ♥
0

updated desk space - photo board


A few late nights ago I was incredibly bored and fidgety so decided to make something that popped into my head earlier that day. It was already midnight so I thought this would be something easy to do before bed and I wouldn't make too much noise in the process. I decided to make a photo board. I knew I had everything I would need, given that I'd been to Ikea the weekend before and my kitchen still had all the cardboard boxes sitting there waiting to be recycled, so I put a few bits to good use. It didn't actually take much effort to make, just patience,


I'll be making a DIY on this shortly for anyone that's interested. It costs next to nothing and it looks super cute! It's also really handy for me because we're not allowed to tack or pin anything to the walls so putting up frames or art is a no go, so this is the next best thing. Will definitely be making another for the bedroom!

I've also added in a shot of what my desk usually looks like when I'm doing something or making something. It's not always set up to look like a still from everyone's Pinterest boards, this is what a real desk looks like when it's being used. Snacks and all!

thank you for reading! ♥
0

my little kikki-k collection


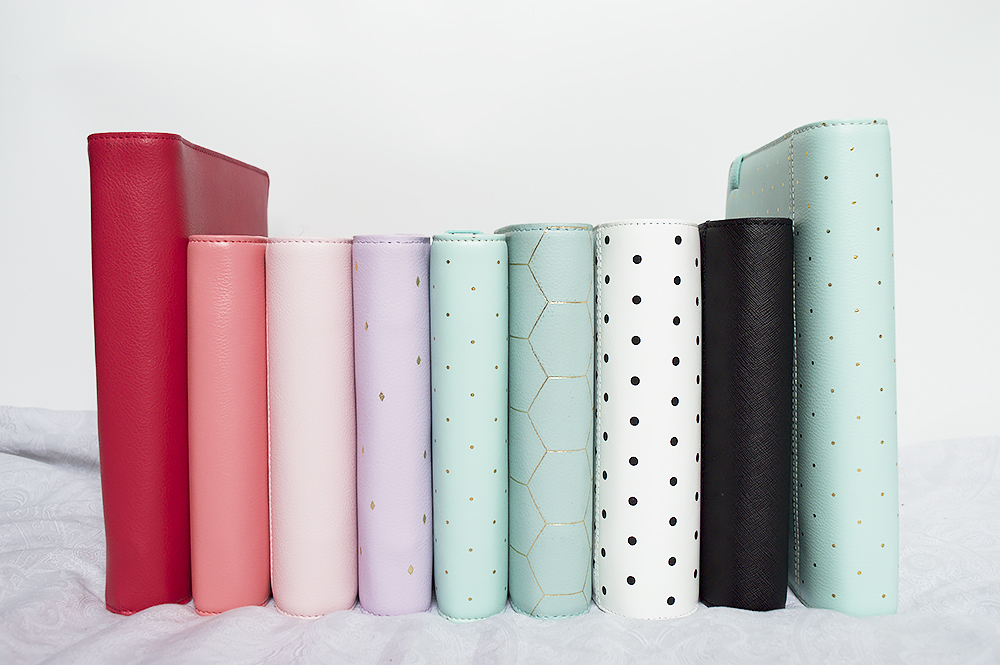
It's not unknown that I like to buy stationery. In fact, besides buying normal things like food and clothing, I'd say it's what I buy most of. In that light, I like to buy planners, too. It started off with buying a Filofax so I could keep track of things like work and money and slowly turned into a hobby of buying more and more. I eventually found other brands to work into this hobby, the main one being Kikki.K, an absolute stationery collectors dream store. Unluckily for me is that I've only ever been able to purchase from them online, as the closest store to me is London, unless I fancy an overnight trip to Australia. (I actually really fancy that!)

My first Kikki.K planners were the mint ones with gold dots. I was originally after the medium personal sized one, but due to them no longer being in production I could only get my hands on whichever size was cropping up on ebay at the time. It took two weeks to arrive from a lovely girl in Australia and when I got it, I was absolutely smitten. I then went on a hunt for the medium size and found a woman on Instagram who was selling hers.

From there I have been adding more Kikki.K planners to my collection. Whenever they release a new planner that I like the look of, I order it straight away as I know once they stop making a certain planner and it's discontinued they eventually sell for crazy prices online and are almost impossible to get a hold of. I have nine in my collection so far and have seen from their snapchat that they'll soon be releasing a rose gold planner which I will absolutely be buying as soon as it hits the UK store! Rose gold! *heavy breathing


Apart from the polka dot and textured black planner pictured above, all other planners here have been discontinued. If you did want to get one in this style you would need to hunt online for one. Ebay is generally good for finding them, but usually come with quite a high price!


You'll have to excuse the dim light in these photos, living in Scotland generally means living in cloudy overcast, hence the lack of brightness! If anyone has any questions on Kikki.K or would be interested in talking more about planners and such, I would love that!

written by Kirsty - thank you for reading! ♥
0

New stationery finds - Sainsbury's


I love buying stationery, I always have. I love it even more when my closest shop sells super cute stationery including washi tape! I was in Sainsbury's a few days ago, probably buying cat litter or something and casually took a wander down the stationery aisle. I tend not to buy stationery from supermarkets as I find the quality to be a little lacking and it's more than likely quite tacky. That was until I spotted these cute little items! They must change the collections they have on display fairly frequently as I'd never seen them before.

I bought two packs of the washi tape, because why not. They are so lovely, especially the gold glitter one! I go through huge amounts of washi tape and I have no idea how so I tend to buy in bulk. I probably should have bought a few more but I'm sure I can nip back down and get some. I also bought a little jar full of little gold clips. They are similar to bulldog clips but the handle bits don't bend down, they just sort of stick up at the top, which does actually look cute! I picked up the cute little sticky note set as well, mainly for the floral stickies. I might not be the most girliest of girls but when it comes to stationery, I crumble next to girly florals and pinks.

If you're into stationery then definitely have a look in your nearest Sainsbury's for this collection! They have loads of matching notebooks and pencil cases, too!

love,
Thanks for reading!
0

A SIMPLE DIY - DREAM CATCHER


Last night's sleep was not good, however it did give me a cute little idea. I couldn't get to sleep until around 4:30am and in all the time awake I managed to think up this little diy. I tmade this in around an hour and given that I haven't made anything in a few months or so it was quite therapeutic to actually do something with my hands and not just type something out for a while.

What you'll need - 
an empty pringles tube (I'm giving you permission to finish a whole tube!)
a bread knife / something sharp
colourful washi tape
string / twine / ribbon
a lot of patience

step 1
Buy some pringles and finish off the tube, you'll need the top bit of it. I would recommend the bbq flavour, they're definitely my favourite.

step 2
I used a bread knife for this part. You need to cut off the little metal-ish part at the top of the tube, the bit that the lid pops on to. I used a bread knife just because it cut through very easily and scissors would have been quite difficult to manoeuvre around it. This will give you the circle you need to work from.

step 3
Tie some string in a knot at a random bit of the circle, wrap it around the circle a few times and then take the string to the opposite side of the circle and tie another knot. Repeat this until the whole circle has been wrapped in string and you have something that resembles something similar to a bike wheel.

step 4
Take a separate piece of string and wrap it around the inside bits of string (the bits that look like bike tire spokes), to form an inside circle of string. You can do this as many times as you like until you reach the desired effect you're looking for.

step 5
Grab your favourite washi tape and place two bits of washi on either side of a separate piece of string, making sure you leave enough room at the top and bottom to add more feathers and to tie to the dream catcher. Cut the washi into feather shapes and make a few precise cuts at the side of feathers along the edges.

step 6
Attach the string with the washi feathers to the bottom of your dream catcher. I put mine at different lengths so it didn't look symmetrical.

step 7
Add some smaller lengths of washi to parts of the body of the dream catcher and wrap it around. This is mainly for colour and aesthetic value.

step 8
Make a loop of string at the top of the dream catcher in order to hang it up.

Viola, a very cheap and easy way to make a dream catcher. It looks super cute too! I might make a few more, that way I can hang one in every room, much to my eye-rolling boyfriend's benefit. If you do decide to follow this diy please let me know. I'd love to see if any of you make this!

love,
Thanks for reading!
0

favourite stationery items and where to find them


Pens - Sharpie pen (whsmith), Paperchase gel pen (paperchase), Pilot Frixion erasable (whsmith).
Highlighters - Zebra Mildliners (amazon), Pilot Frixion erasable (whsmith).
Washi tape - Etsy, Paperchase, Ebay.
Stickers - Martha Stewart dew drops (staples).
Sticky notes - Target to do stickies (target), WHSmith chevron notes (whsmith).
Notebooks - Rifle Paper Company notebooks (paperchase).
Page flags - Etsy, Ebay, Target.

It's absolutely no secret that I love stationery. In fact, it's the only sort of hobby I've kept since I was child. I was obsessed with stationery when I was young, which has only developed over time into a very colourful and satisfying hobby over the years. I tend to buy most of my stationery from the same few places; Those being - Paperchase, WHSmith, Etsy, Ebay, Amazon, Target and Staples. Most of things pictured are quite easily procured in the UK, however the Target items are only sold in the US so you'd either need to be friends with someone over there or buy them on Ebay/Etsy. The dew drop stickers from Staples are discontinued I think, which is a shame, but you can find stickers that are very similar online, again on Etsy.

I use everything in this picture almost on a daily basis, I like to write things down a lot and plan things and having the pages nicely decorated with washi tape or highlighted in a pastel shade highlighter just makes things that little bit nicer. I'll list some of my favourite online shops too, just incase I've tickled your fancy for buying some cute stationery!


Some of the Etsy shops above state that they only ship to the US, however I've found that if you send them a message asking if they'd kindly ship to the UK at a bit of an extra cost, most shop owners will oblige. Damn US and their cute stationery items!

thank you for reading! ♥ // bloglovin | twitter | instagram
3

How I decorate my planner pages


This is a post that I get quite a lot of requests for. I've been using a planner for a good few years, going all the way back to my high school days. It's only been the last two or so years that I've been using Filofax or binder type planners. I'm a member of a few of the Facebook groups for Filofax and planners and regularly post pictures of my decorated weeks for others to see and maybe get some inspiration from. I like to decorate my weekly planning pages, as I think that it helps me write in them more, especially if they're nice and colourful.

I mainly decorate with washi tape and stickers, quite a simple way to decorate but it's a very quick and easy to add some colour to your planner. I also like to use some page flags and sticky notes, the ones pictured are from Target. A lovely lady from one of the Facebook groups kindly sent me from the US, seeing as we don't have a Target store in the UK. I like to decorate at the top and the bottom of the pages, adding some colourful washi tape or stickers. I don't tend to put too much in the middle of the boxes as it takes away space to write in. Having a personal sized planner, you kind of need as much to room to write as possible.

I don't add too much to a new week until I have it properly planned out. The week pictured here is actually starting the 27th of July. I like to decorate in advance, that way I can write things down for the next few weeks. I will put down stuff that I know is guaranteed, like my holiday finishing, my family visiting and the fact that I'm buying a beautiful Gillio planner. I like to use sticky notes to roughly write down what I plan to do in that week and then once I've confirmed the dates and times I'll use pen to write it in permanently.


You can see above that this is a decorated week, with a sticky note of other plans. I used washi tape and the top and the bottom, along with a little sticker decorating the middle of the bottom washi tape. I used a little gold arrow to show that it's the last week of my holiday. I drew some fancy lettering on the Sunday to show the end of my holiday along with a few to-do's for that day that will need to be done on the Sunday. I've also used a page flag to show that my mum and brother are visiting my on the Saturday into the Sunday.

Everyone decorates their planner differently, but I thought I'd show you how I do mine! If you decorate your planner or even use planners like these, let me know. I'm always eager to find other people who share my hobby!

thank you for reading! ♥ // bloglovin | twitter | instagram
3

inspired to get a bit more crafty!


♥ what cool way to decorate a plain white teacup - here
♥ some very tasty looking breaking bad inspired cupcakes! - here
♥ a quirky way to give a cupcake to someone - here
♥ how cute are these little planters? - here
♥ lovely little stamps for writing letters etc - here
♥ an amazing origami bowtie! - here

Recently I've been in the mood to get a bit more creative. I have a few birthdays coming up soon and with Christmas creeping around the corner I'm looking to go home made this year. I used to make gifts all the time but I fell out of it when I realised it was just easier to buy things. But I think that a home made gift has that little extra something, and all these cute little diy's have given me a lot of inspiration. Especially the teacups and planers! So cute!
2

How I stay organised - featuring Kikki.K


That title should actually be more along the lines of 'How I try to stay organised - featuring Kikki.K', but anyway...

As I've mentioned before, I've recently rekindled my love of stationery and all the cutesy goodness that it brings. I loved art and craft as a kid and naturally with that came a love of stationery as well. My favourite place to visit as a kid for present ideas or if my mum and dad were feeling a bit generous, for a random little gift, was Stationery Box. Anyone remember them? I'm pretty sure they were bought over and became Ryman, but either way, the shop is still sort of there. With finding my love of paper and craft again, I recently got drawn into the world of Filofax. I had always been sort of organised, but never before like this. I also never realised the extent of the Filofax community, and it really is a community. If you don't have an interest in stationery or Filofax, then this post might make you think that I'm completely crazy, but trust me it's very satisfying seeing all your organising in one cute little folder.

I started off with a few Filofax's and then gradually I started seeing more and more people talking about Kikki.K, a lovely Swedish brand, similar to Filofax. I first seen them around instagram, when everyone was going on and on about their now discontinued mint planner with gold got accents. I knew at this point that I had to get my hands on one! I had been using the Filofax Finsbury in raspberry and the Filofax Classic in pink up until then, but I wanted something a bit more colourful and girly. I eventually found a lovely girl from Australia, where Kikki.K is mainly based, who was selling one for auction on ebay, which I managed to nab for £120. It seems pretty steep, but honestly, I absolutely love it. Since then, I've also purchased their newest planner release, the lilac time planner with gold accents and gold rings. It's beautiful. I don't know if it's possible to love and treat a planner like a child, but I kind of do. Oh well. Now, onto the planners themselves.


Like I said above, I have the mint and lilac time planners. The mint planner is the large size, which is the equivalent to Filofax A5 and the lilac is the medium size, equivalent to Filofax personal. I absolutely adore the colours, especially the lilac with the cute little gold diamonds. I'm not so keen on the gold rings, I wish they weren't quite as gold and maybe a little less yellow, but you can't please everyone. The leather on the planners is really good quality and is quite supple and bendy, meaning that you can fit loads inside. All of the Kikki.K time planners come with monthly, weekly, address, birthdays, restaurants, expenses and to do tabs, but I only use some of them. I don't use the address, birthday or restaurants tabs, so I just whip them out and replace them with note paper or list paper. The lilac planner comes with really cute pale pink dividers and the mint planner comes with dark royal blue dividers, which I wasn't keen on at all.

I use the monthly pages to plan out birthdays, appointments and shifts at work and I used the weekly pages to write out things in more detail. I use the expense pages to work out where my money is coming in from and where and when it going, which has helped me save a bit of money recently, and even helped me get back on track with my credit card! I have a habit of just spending money on my card without realising how much I'm actually spending; but now when I buy something, I write down what I bought, where I bought it, how much it was and how I paid for it. It makes it really easy to see where most of my money is going and shows me where to cut back. It's super handy!


I like to decorate the weekly pages with washi tapes, stickers and generally just things that make the pages look a little more fun. I tend to do things more if the pages I'm looking at are a little more appealing. It's kind of childish that I need a bit of colour to draw my attention to it, but what ya gonna do. Plus, look how cute the little stickers are! I've been using the Kikki.K planners for for around ten weeks now and I have to say that I've been a lot more organised as a result. I'm going to be incorporating my blogging schedule into my planners very soon, as I think it will help me be able to post a bit more frequently, if I'm being reminded to do it on a daily basis!

After reading this back to myself I realise that I come across as a little bit weird, but you love what you love! If you do like Filofax or stationery and the like, then please comment letting me know I'm not the only stationery nerd out there, or follow me on my planner instagram - hellozeldaloves. I'm looking for penpals as well, as I have a thing for writing letters, too. If any of you'd like to be penpals, please let me know!

I hope this didn't make me sound too crazy! ;)

- I'd just like to point out that this post was in no way sponsored, I just love Kikki.K! -

post signature
15
Powered by Blogger.